Saturday, April 19, 2014

Can Deli Wrap Become a Quilt?

In a previous post I showed some of the pretty papers that I created with the Gelli Plate.  I have a large stack of pretty papers.  A LOT of them.  I can and do use them in my journals.  But I still have a LOT of them.  So I was considering how to use what I had created in a new and unusual way.

So I backed some of them with fusible Wonder Under, cut them in layers, fused them onto batting, and created a little quilt.  Here it is.


And I really like it.  I quilted it and there was no problem with tearing.  The texture is quite different than fabric - but I think it may offer a new and interesting variation to my quilting.

Next I am going to create a background this way and then add a shape in the foreground. 

barbara

Art Object

My brother has a strange sense of humor just like I do.  So I find weird things to give him as presents.  If I see something and it makes me laugh out loud and it doesn't cost too much, it becomes a present for Bobby.
I found this little treasure in an antique store.  Made me laugh out LOUD.  Bobby liked it too.
Too funny not too share with you!            barbara

When is a Cow not really a Cow?

  While they worked on their projects (which turned out to be AMAZING) I played with a CB2 catalog and just cut out shapes and designs that I liked.  Had a little stack of them and started to put them together - and this is what it turned into.

 
I laughed and took it home and put it on my design wall - and fell in love with the basic shapes and the way they worked together.   I was done with my 100 Days of Paper and decided that this was the perfect design to launch myself back into quilting.

Here is what it looked like before it was completed.
And here is what it looked like when it was done.
And I love it.  People have rather strange reactions when I show them.  Many of them are concerned about the two "missing legs".  They don't mind the wing too much - but the legs.....  I am amused by that reaction.  But most people who know me just smile and say that it looks like something I would create.   Such a Happy Cow!           barbara


100 Days Project is Over

So I actually DID work in my studio - ON PAPER NOT FABRIC - for 100 days in a row.  And I am glad that I did.  It was hard at times to convince myself to keep going.  But I learned a lot - found new materials to use in my quilts, and discovered a new inspiration for my next chapter of quilting.

And I am excited about quilting again.  So - are you wondering what the inspiration is?  Check out the picture below.
I started with a beautiful face from a magazine - Kate Winslet.  Then created a background with strips of paper and some paint.  Then started adding whimsy to the face and hair and dress.  And a bird.

AND - this is the important part - I realized that maybe this would work with my portrait quilts.  I could COMBINE the technique I learned from Esterita Austin to make portraits and then ADD whimsical elements around the face itself.

This may or may not excite you.  But WOW was I excited to have this thought enter my head.  I had never considered combining the two very different styles that I enjoy into a single quilt.  AND it would make my portraits even MORE my own style.  Hmmmm.  My very own style....  Makes me grin and feel all cozy just thinking about it.

I'll post some photos when I get started.....     barbara

Where have I been?

Oops.  Just realized that my last post was in January!  Yikes!  What have I been doing?  Well....
Winter was crazy weird and COLD for Arkansas.  So there was that.  Then I had the horrid flu thing and was too sick to even quilt or draw.  So there was that.  And then stuff happened and got busy - BUT all of that is NO excuse to have skipped all these months.

I guess part of me isn't sure that anyone ever looks at my blog (I know, boohoo poor me) so I just don't take the time to update.  BUT that is no excuse either.

So.  I am going to backtrack a little bit and you will see all sorts of entries with this same date.  But it took months to actually make all the collages and quilts. 

barbara

Sunday, January 12, 2014

Three Melting Ladies

Another experiment.  Gosh it is fun when things don't work out.  I learn SO much more!

I was experimenting with the PaintOver technique starting with a black and white copy of a face from a magazine.

The one on the far left is my first attempt.  When I tried to paint a glaze of white paint over the face, the ink smeared.  No matter what I did, it smeared.  I tried different products (see the middle face) and that helped a bit - but still smeared.

Hmmmm.  I called my friend Jan for advice.  She uses many products in her art journals and is more experienced with smearing water soluble inks.  She suggested a few things to try.

The one that finally worked (face on the right) was to iron the copy, then spray it with Fixatif.  I had to be quick and cautious - but almost no smearing.

So then I was faced (ha!) with the dilemma of two smeary faces.  Should I just toss them in the
trash?  Tempting.  But I want to learn to honor my mistakes - so I stacked them up and plunked them on some scrapbook paper.  And I like it!  Looks like it was planned from the beginning. 

barbara

Successful Gelli MonoPrint

I have printed MANY prints on paper and on deli paper with the Gelli Plate.  And gotten lots of fine results.

But - never what I would call an Intended or Purposeful print.  One that turned out like it was planned.

And that is because you have to think sort of backwards to get what you want.  And I have trouble both driving my car backwards (trust me I am DANGEROUS!!) and thinking backward.

So I signed up for one of Julie FFBalzers mini lessons on Gelli printing.  And I did every single lesson.  That is where I learned to make those gloppy faces in the previous post.  She is an excellent and organized teacher and I finally understand.

This is the print that I made following her very specific instructions.  And I love it.  It is even better in real life than in the photo.  There are five layers of paint on this monoprint.  And the paint is so thin that you can barely feel it on the paper.

I intend to make more.  I like the way that you can see all this depth in the design.  Do I need to start wearing my baseball cap backwards now that I know how to THINK backwards??    barbara

Friday, January 10, 2014

Experimenting with Faces

I always enjoy playing with faces.  Many months ago I bought this face stencil from Julie Fei Fen Balzer (one of my All Time Favorite artists and on line class teachers!!!).

Never used it.  Then remembered it when I was re-watching a DVD called All About Faces.  Julie shows how to shade faces and how to USE the stencil without making it as rigid a tool as you would imagine.

So I tried her technique which involves penciling in the basic edges of the stencil and then glopping (aka casually applying paint in large areas) for the face background and the hair.

Next you use the stencil again to pencil in the eyes, nose and mouth.  Then add a couple of layers of paint for shading the face.  Then use the stencil to add the dark lines.  Then use a teeny tiny paintbrush to connect the stencil line and add details to the facial features.  And VOILA - you have a face. 

It looks like a Julie Face (of course - no surprise).  And I wouldn't just add Julie Faces all over my journal or whatever.  BUT - here is the awesome part - it made me feel secure about the location of facial features. 

I have been drawing faces for years but this gave me a whole new layer of confidence.  I was surprised.  Didn't really realize I was lacking confidence.  Ha!

Sooooo - this is what I did next........
I took the blobby faces that I had made with the Gelli plate (again based on Julie FFB's great instructions) and bravely added lines.  I made a color copy first (on the left) to show the difference a few simple lines could make.  I didn't add anything other than the black lines.

HUGE difference.  So I tried it with a few others... check it out!


Are you ready for a surprise?  This guy was made using the same face as the yellow guy as a guideline for the Gelli painting.  Uh huh!  Shows how unpredictable that whole process can be!  And super FUN. 

One more.....
And I realize this little chickie looks rather evil.  In part because of her green face.  But I am dazzled by the structure that a few little lines can add.

I am going to experiment with this some more.  AND cut out these new funky faces and put them in my journal.  New post coming SOON! 
barbara

Thursday, January 9, 2014

Thoughts on 100 Day Project

No photos in this post.  Just thoughts.

Tackling a project for 100 days is a significant commitment.  I think the important thing is to select something that has room for a lot of experimentation.  And Paper Collage certainly has given me room to grow.

What have I learned?  A million different things.  But the most important is that having ART in my every day life is really good for me.  As a person and as an artist.  It makes me happy.  It fills my time with wonderful ideas and creativity and having that time filled instead of empty makes me happier.  I don't have room for political and grumpy clutter thinking.

And I am learning things that are going to make me a better artist.  For sure.  About faces and color and balance - room to experiment has given me time to make mistakes and to learn from those mistakes.  Much better than learning from a book.  Or should I say trying to learn from a book.  Real hands-on learning is totally different.

So.  I am happy that I started this project.  I will continue to the end.  And I may even do another one - with a new focus.   Hmmmmm..... something to think about.            barbara

Long Time

Wow.  It has been almost forever since I posted photos about my 100 Day Project.  Does that mean that I stopped?  Nope.  It means that I have been so wildly busy creating that I haven't wanted to take the time to post on my blog.  My bad! 

But - here are a bunch of photos of some of the things that I have been working on and learning from with short notes explaining what they are.....

Created a background using the Gelli Plate and then added a magazine photo.


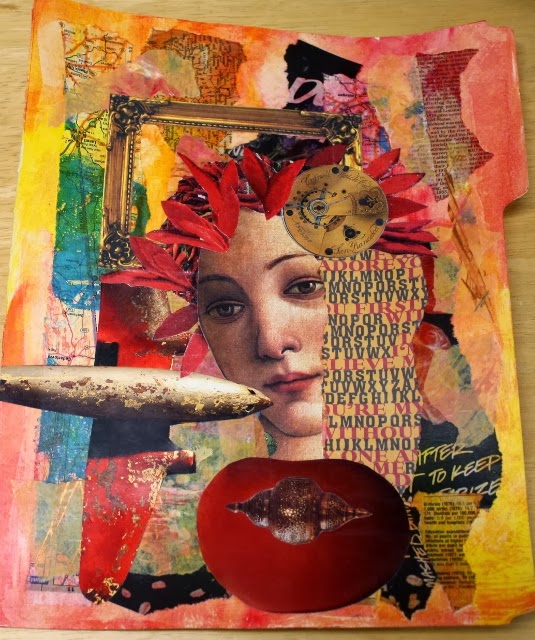
And then added lots of bits and pieces and layers and paint and ended up with this piece.
Pretty interesting - and a LOT of fun.  Learned a lot too.


  Then I tried another one.  With a bird.  I like the layers around the edges and had a lot of fun adding tiny bits with pens and such.


This one started with a manila folder, scraps of all sorts of paper glued on in a random pattern.  Then an orange glaze to pull it all together.  Actually I had a lot of doubt about the glaze thing actually working - thought it was crazy to even try - but VOILA - it worked and the background was fine.

Then started adding layers and details.

And was OK with the basics.... then added more.....


This one got totally crazy.  Started with the purple boots.  Grew from there.  LOTS of fun.  Pretty peculiar but I learned about distributing color and white to balance the composition.


Found some old alpha stamps that  I got at a garage sale and never used.  But they had really neat little wooden handles.  Took off the alpha stamps, used some bits of sticky foam for designs - and they are wonderful for adding a bit of texture to any design.

Also learned that almost all of my old and moldy stamp pads no longer worked at all (FRUSTRATING!) and that I need to get some more...... 

But had fun experimenting.


These are some larger sticky foam stamps that I made.  These will be used to add texture to my Gelli prints.  They work great for that purpose.

This type of project is SOOO much fun.  You can really explore making exotic and creative designs with inexpensive materials.

Need to see if I can brayer paint on these and add to existing designs....  Hmmmm.....


Some friends want to try making paper dolls.  There are a million ways to approach this project.  Some are better than others.  One of the limiting factors is how to make a very "personal" doll without a huge amount of ephemera to pull from.

This is one idea.  I know, I know.... you can tell that one of the catalogs that I drew bits from was Victoria Secret!  But this is fantasy!!  Cool!!

This would be the first thing to try for a paper doll - sort of a way to get brave and experiment.  

Check out the next one.....

Ah yes.  This one is much more MY personality.  After getting the basics down and getting confident - one can sort of leap off the edge and get really crazy and fun!


More experimenting with the Gelli plate.  Place a photo under the plate and sort of glob paint on to trace the features - then print.  Sort of scary.  

But then I did something more - in the next post you will see the difference.


Here is the second globby painting.  I like it a lot.  


Sooooo - Lots of experiments.  Lots of FUN.  Lots of learning.


More soon....  barbara

Wednesday, November 27, 2013

Overpainting a Photo

Day 18 - Since I was painting over photos anyway, I decided to try a larger format 10 x 12 inch experiment.

First I prepared the background with painted deli wrap and then found an interesting photo in a catalog and glued that in place. 


And then I started to make changes.  First I painted over the face with transparent Claudine Hellmuth paint.  Using this paint instead of other acrylic paint meant that I could see through the paint in order to draw over the features.  Then I added part of a green wreath from a catalog as hair, more deli wrap and printed paper as clothing, a deli wrap butterfly and additional layers of stamps and paint. 

Turned out sort of weird don't you think?  But a worthy experiment to try to actually USE a lot of the previous days' lessons.

I had an interesting thought this morning.  It may be that many 100 Day Project people have this thought right about now.  I was wondering if there were enough collage projects left in my brain for 80 more days???  Then I remembered that I don't need to do something DIFFERENT each day - I just need to DO something each day.  That made me feel better.

I worked so long at this project yesterday that I considered taking two days credit for it.  But I don't want to cheat the process so I am going to sneak in some studio time today.  Tomorrow is Thanksgiving - maybe I will make a turkey collage.  Or not....         barbara

Monday, November 25, 2013

Strange Paint Over Technique

Day 16 and 17
Soooo there was this technique in one of my collage books - and I wanted to try it.  You take a copy of a photo and paint over it to make it look sort of like a painting.  Sort of.

This first one was awful and gross.  But I learned a lot.  The directions said to use acrylic paint but that was too heavy and covered up all the details.  And the photo was printed in sepia which made it less clear.


So I tried again.  This time I used a slightly larger photo (5 x 7) , black and white, and used Inktense pencils with water instead of acrylic.

It worked better because you can see more of the details of the original photo.

Unfortunately I tried to make the little eyeballs look better and that did not work well.  Oh my.


So I picked a different photo.  I really like this photo.  I even like the way it turned out.

But - I don't really understand how this is better than just cutting out the main part of the photo and gluing it down to a background. 

barbara

Sunday, November 24, 2013

Wings and Agnes is Elevating and Balancing


So I decided to start working on images for collage instead of just backgrounds.

Day 14 and 15    The challenge for these two days was to look in catalogs and find images that could be altered and made into something a little different.  This one is pretty simple but I do like the addition of the sparkly wings.


This one started with a photo of two vases (one large and one small).  The large vase is the "body" of this fine lady.  The smaller vase was sliced into skinny long arms.  And the hat was part of a very Moroccan looking hanging light fixture.  The hair was sliced from a red pepper wreath.  I like her a lot.  Perhaps she deserves a name..... Agnes!  Yes!  Agnes is Elevating and Balancing!

barbara

Thursday, November 21, 2013

A Face Appears, Crackles and a Dog!

 Day 10 - I enjoyed this one.  Not sure what do attempt so I just took torn bits of painted deli wrap and used gel medium to glue it down.  Also medium over the top.  Great fun and I always love to see faces appear in my work!

The deli wrap is such a great collage material because it disappears when it is glued with medium.  AND if you use the right medium, you can easily write or draw over it.  The trick is to use a medium with enough TOOTH.  Who knew???


Day 11 and 12 - It doesn't look like much but this is Distress Crackle Medium.  It took two days for this because the first area where I applied the medium (on the right) it was too thin to crackle effectively.

So I glopped it on thickly.  And it worked really well.


OK.  So I admit this little guy is strange.  I saw his picture in a catalog and just knew that I needed that cute little face on a card.  I didn't have any cards with the right color - so I used an entire layer of painted deli wrap to cover the background and then used gel medium to attach Mr. Dog.  And his strange little body.  I did learn that magazine photos need to be applied more carefully because he is sort of wrinkly.
But I like him anyway.
This was Day 13.


On Day 13 I also did mono printing on the Gelli Plate.  I am having a LOT of fun with this and creating scads of paper to use in collages.  I print over old sketchbook pages and on deli wrap and am having fun trying new stencils.

I wonder what is next?   Hmmmm.....

barbara


Sunday, November 17, 2013

Applying texture thru Stencils

 Day 9 - I had time to actually experiment.  Some experiments were a success - and then there was this one.....  YUCK!

I applied black and white gesso thru a stencil using a palette knife.  The black was just ugly - and not because of the color.  The designs were just not crisp.  But the white gesso did an interesting thing - along the edge extra gesso went under the stencil but feathered out and made it look like I did something complicated.  But still nothing that I would do again.

Since I don't like to fail at something, I tried the gesso again.  I was trying to use a different angle with the palette knife.  Still looked awful.

But then I tried using a makeup sponge to apply the gesso and it worked a lot better.  The circles on the bottom are the ones applied with the sponge.

So then I tried Modeling Paste applied thru a stencil with a palette knife.  It worked great.  Very lumpy but a clear design.  On some areas I smoothed the paste, on others I tried to make it lumpy.

I have no idea how I will use this - but it was fun to try.

Again with the SPARKLES!!!  My favorite thing!  This is gel medium applied thru a stencil with a palette knife and then cheapo glitter sprinkled on.  And it seems very stable.  And fun.  I didn't try applying the gel medium with a sponge but that might make the circles more completely filled.

barbara


Saturday, November 16, 2013

Sparkles

 Day 7   It is hard to tell from the photos but this experiment was using a foam pad to apply Perfect Medium thru a stencil and then adding Perfect Pearls.  The result is wonderful a shiny design that seems very sturdy.


 Day 8   Another product to try for shine.... Inka Gold applied thru a stencil with a foam pad.  Comparing the two ways to accomplish such similar results - I would definitely choose the Perfect Pearls.

barbara


Thursday, November 14, 2013

Resisting

 Stamping with acrylic paint and using a variety of sprays to add color.  Before the spray dries, I wiped off the excess to reveal the stamped pattern.
The purple and green card stamped with corrugated cardboard is my favorite - probably because of the color contrast.

Even though I am not specifically focusing on color right now- I am learning a LOT about what I like and don't like.  Mostly I don't like the ones that are boring....  No surprise!

barbara

Wednesday, November 13, 2013

Masks and Stencils

On Day 5 I used masks and stencils.  It was fun to see the difference and really fun to try to combine both on one card.

 I can really use this in my journals.
barbara


Tuesday, November 12, 2013

Learning New Things

The 100 Days project, for me, is all about learning new things.  My project focuses on collage.  My initial focus is on creating layered backgrounds for my collages.  This includes using lots of NEW products and techniques that I have never tried before.  Scary!
I prefer working IN my comfort zone where I usually can succeed.  This project is OUT of my comfort zone.  And - surprisingly - I am really enjoying it.
I find that I am hesitant to try certain new things but once I start - I am totally involved and enjoying the process.  So I guess my 100 Day Project is a success so far - even if what I am creating is at times dorky and clumsy.

So here are some of my attempts to learn new things:

Day 2 and 3 - the green one is a mask, the red one is a stencil.  I was trying to really experience the difference between them.  


Day 4 - OK this one was very disappointing.  I used acrylic paint on a stamp and then used distress ink over the top and used a damp cloth to remove the ink from the white stamped image.
This is an example of a resist.
The idea is good - but I found out that some of the products (like the distress ink pads) are WAY OLD and no longer work like they are designed.  So I need to revisit this technique with other products later.


Day 5 - I made a triangle stencil and mask and also used a purchased stencil and played with them on two cards.  Fun.  It requires thinking to figure out what order to add the various layers.


Day 6 - Played with corrugated cardboard as a stamp.  The initial layer was the cardboard with acrylic paint.  Then I used various spray colors (ColorWash and Dylusions) over the initial layer.  Then wiped off the excess to reveal the stamped pattern.
Learned a lot - including the fact that some colors are a lot better than others and that contrast is good.
The spray is fun to use but since it is water soluble you could not layer paper using gel medium because the medium would dissolve the spray and color what you are adding.  Good to know.


This is my favorite one of the day because of the different directions of the lines in different colors.

Looking forward to more adventures in the next few days..... and weeks.....  uh huh!!

barbara